My oldest and best friend grew up on a farm. Being a City Girl, I couldn’t imagine a better, more exciting and adventurous place to be! Her family was so far out in the country that the dirt road to their house is named after them and will likely never be paved. They raised cattle, alfalfa, and cotton. Down the road a ways was a pond where she and I would pretend we were part of the crew of the Calypso, working with Jacques Cousteau to save the whales! And even though the pond was incredibly shallow, we needed a scuba mask, at very least, to try to see through the murk! Honestly, there could have been rare, as-yet-undiscovered jelly-fish in that pond and no one would ever know it, that’s how dark brown the water was. The best part of the farm, though, was Little Britches.
Britches was a gelded Quarter Horse and while he was used on the farm for this and that, he was HER horse, and he let everyone know it. He was gentle, patient, easy to ride, and loved apples. The weekends and summers I spent there remain the brightest memories of my youth. And I knew I wanted to spend my life living on a farm.
God, it seems, had other plans, and I am well and truly ensconced in suburbia. My memories, though, are untarnished, if a bit romanticized.
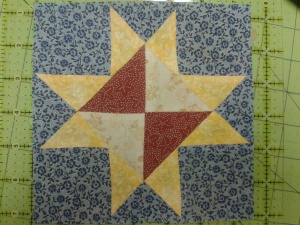
I don’t know if it’s the memories, or the colors, or the shape, but I LOVE this block! This block makes me happy just to look at. None of the others, so far, have evoked that feeling. Maybe someday I’ll make a whole quilt of these. Time will tell.
This block only uses three templates: 1, 3, and 20, and four fabrics, which I’m going to refer to as red, cream, yellow, and blue.
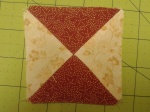
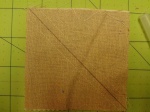 The center of the block is an hourglass. Rather than cutting two red and two cream #3 triangles, I grabbed two charms, placed them right sides together and traced a diagonal line from one corner to the other. Using that line as a guide, and using a couple of pins to hold things together, I sewed 1/4″ to either side of the line. Then I cut along the line and pressed the seams toward the red fabric.
I know I’ve been pressing seams open quite a bit lately, but for this to work, pressing to the dark allowed me to take my two halves, place them right sides together, and nest the seams so that my center points match up perfectly. Another good press, then I set it down in the center of my work area.
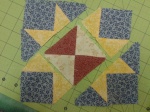 Ok, now it’s getting a little dicey. We have 8 yellow #20 triangles, 4 blue #20 triangles, and 4 blue #1 squares. Start with the squares positioned on point and place two yellow triangles to either side of the bottom point, with the long side the yellow triangle along the side of the square. I chain stitched one triangle to each square and pressed the seams, then I repeated the process with the triangle on the other side. I set all the corner units back on the layout board. Then I took the blue #20 triangles and laid them next to the yellow triangles on the upper left and lower right corner units. I laid the blue triangles on top of their yellow counterparts and sewed them in place, one at a time, then pressed the seams toward the blue.
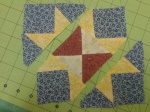 From this point on, it’s really straightforward. I sewed the smaller corner units to opposite sides of the center hourglass. Then, using pins at the seams to match them up and hold them in place, I sewed first the right corner unit then the left corner unit. I pressed the seams away from the hourglass.
And here’s the finished block, all squared up to 6 1/2″. I LOVE this block!!! Yep, I can see a whole quilt made out of this block, each one slightly different, maybe from lighter to darker, one corner to the other. Time will tell.
Leave a comment