Spider Web #83

Leave a comment

Have you ever been walking in the woods and seen a large spiderweb?  I love finding them, especially early in the morning with dew glistening on them.  They’re so delicate and intricate.  They fascinate me.

2014-02-08 13.42.16This block is made of wedge pieces that, honestly, remind me of candy corn, especially if you use an orange and a light color.  Which I did.

Sew together one #54 and one #87 to form a candy corn shape.

Next, sew a #88 to the top edge of a #86, then sew a #7 triangle to the top of the #88.  Press well.  I put my shapes into two piles


2014-02-08 13.57.05Using pins to match up the seams, lay the pieces right sides together and sew together in pairs.

Next, sew the pairs together in pairs, making two halves of the block.


2014-02-08 14.05.12Lastly, sew the two halves together to make the full block.  You need to be really careful to match up the seams to make sure your center points meet neatly.  Mine don’t, but I decided they were close enough to suit me.  Looking at the picture, though, I’m not so sure.

I wonder if a really spider web is out of perfect symmetry…

Spider Legs #81

Leave a comment

My ex-husband had a spider fetish.  He had a pet tarantula for a couple of years.  It was fascinating to watch, in a bizarre, nightmarish sort of way.  It was huge, ate crickets, and generally freaked me out.  I know that, unless provoked, the tarantula will not bite people.  Didn’t make me want to hold it, though!

This block reminded me of my that damned spider.  I kind of like the way it looks, but it’s a scary block just the same.  Lots of little pieces, lots of chances for distortion.  When pressing the seams, finger press them open, then lay the iron straight down on it and give it a hit of steam, then lift off the iron and move on.  I had to make this block twice because the first one turned out too skeewampus.  Damned spiders, anyway.

2014-02-07 21.58.36The diagonal pieces of the block make up the legs, in pairs.  For the Right leg, sew a #85 triangle to a #77 dark.  Sew a #77 light onto that, then a #78.

For the Left leg, it’s exactly the same except you’re using #77R instead of #77.

Carefully matching up the seams, sew the right and left sides together and press the center.

Repeat for the remaining three pairs of legs.


2014-02-07 22.27.34Now to put it all together.  Sew a #15 triangle to opposite sides of the right and left pairs of legs.  Sew the top and bottom pairs of legs to opposite sides of the #4 center square.

Sew a triangle/leg/triangle unit to either side of the center leg unit, press well.


2014-02-07 22.39.28Be careful squaring it up as it’s easy (for me, anyway) to get off center.

Despite my fear of spiders large or small, I do like the way this one turned out.  Not in a rush to make it again, though.

Snowball #81

Leave a comment

I spent my early childhood in Georgia.  Snow isn’t a usual thing.  When I was 12, we moved to Utah.  Our first winter in Utah, there was a LOT of snow!  In fact, our first snow storm, my brothers and I bundled up in coats, hats, scarves snowboots and mittens.  We discovered that snow sticks to knit mittens.  And then melts and soaks through and makes fingers cold.  None of that, however, stopped us from having an epic snowball fight.  In the middle of it, my youngest brother who was 6 at the time, went inside.  My either brother and I couldn’t figure out why.  A couple minutes later, he came back out, all white body and spindly arms and legs, flailing madly as he flung himself into a large snow drift.  He was stark naked.  When asked why, he said he wanted to know what it felt like.  It’s one of my favorite memories.

2014-02-07 20.50.46 This block is quick and easy and is made of HSTs in the corners and squares.

Sew the light and dark #3 triangles together to make HST units.  Gently press the seams to avoid distorting them.

For the first row, sew HST, dark #1 square, and HST together, with the dark half of the HST next to the square.  Repeat for the bottom row.  For the center row, sew a dark #1 square to either side of the light #1 square.

Finally, sew the three rows together, taking care to match the seams.  A final pressing and it’s all done.


2014-02-07 21.05.00This snowball is almost as fast to make as the real thing.  But this one won’t melt through your mittens and freeze your fingers!

Single Wedding Star #80

Leave a comment

I wasn’t sure I would like this block.  It looked a little wonky to me.  And in the back of my mind I secretly wanted it to be a double wedding ring.  I’ve always wanted to learn how to make that quilt.  Maybe someday I will.  But once I got started on this one, it started to grow on me.  And I discovered, it wasn’t as hard as I thought it would be!

2014-02-07 20.12.42I started with the corner square in a square units.  I sewed the long side of a #13 triangle to one side of the #21 square, and repeated the process on the opposite side.  I pressed the seams open, then repeated the process with the remaining two sides.  Another quick press, and the corner units are done.


2014-02-07 20.21.15The next step is even easier than the first.  Sew a dark #25 to a light #25, along the long side, and press the seams either open or to the dark side.

Starting at the top row, sew a corner unit to either side of the rectangle unit.  For the center row, it’s rectangle, center square, rectangle unit.  The bottom row should be the same as the top row.  Press the seams, then sew the rows together, taking care to match the points of all the light pieces as they form a circle.


2014-02-07 20.37.17This could make a very interesting quilt, especially if you don’t sash between the blocks.  I have the feeling some secondary curves would occur.  I may have to check into that.

Silver Lane #79

Leave a comment

This block really intrigued me.  I know that every single block can take on a completely different look just by changing the fabric selections, but this one is such a dramatic change it caught me off guard.  So, being a curious sort, I went to the internet to see if I could find any information of this block.  The answer was a resounding NO.  Different sites had patterns for it, but no other info.  Pooh.  If you know anything about it, please let me know.  For instance, why is a star block named Silver Lane?  Makes me wonder if it got it’s name due to the original fabrics used to make it for the first time.

For this one, I’m going to refer to everything by it’s template number.  There are 3 colors of template #13, and I will refer to them as A, B, or C.  There are two colors for #19, and they’ll be A or B as well.

2014-02-07 15.33.16 
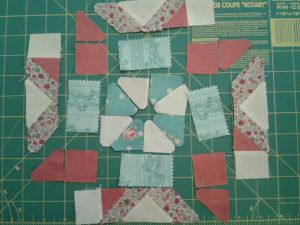
A lot of the time, I’ll start in the center of a block and work my way out, but this one had so many pieces I decided to work from the outside in.

To get started, I chose the #20 triangles from the outside edge and sewed a #100 to one side and a #100R to the other.  I pressed the seams open gently, knowing this could distort easily.  Then I sewed a #13C to either side, matching the long edge of the triangle to the angled edge of the strip.  For the Right and Left strips, I sewed a #19A square to each end.  More gentle pressing and I laid them back in place.  I moved in one step on the Right and Left sides, and sewed a #19B to either end of a number 25 rectangle.


2014-02-07 16.11.12For the center pinwheel, sew together one #13A and #13B triangle; repeat 3 more times.  Press the seams.  Sew them together in pairs, then sew the pairs together.  Take time to make sure the seams match up in the center.  Take the remaining #25 rectangles and sew them on opposite sides of the pinwheel.

Starting in the center, sew the two inner strips to opposite sides of the pinwheel unit, using pins to help match up the seams.  After a careful pressing, sew the top and bottom outer strips to the pinwheel unit.  I finger pressed to find the center and lined it up with the points of the #20 triangle in the outer strip.  Press.


2014-02-07 19.44.00 
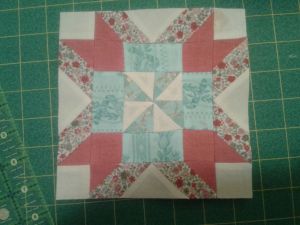
The last step is to sew the Right and Left outer strips to the Right and Left sides of the bloc, respectively.  Pins will be your friends with this step because it’s imperative to match up all the seams.

The end result is a stunning block that looks much more complicated than I thought it would be.