Box Block

1 Comment

I looked at the picture of the finished Box block, looked at the layout, and thought, “Piece of cake!”  Yeah, famous last words.  Ok, truth be told, it IS an easy block to assemble, if you pay attention.  I seem to be having a problem with that lately.  Hmm… maybe I should quit watching NCIS while I’m sewing…

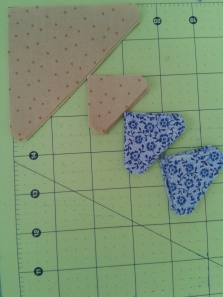
It only takes two fabrics and two templates.2013-01-25 23.25.49

The templates are 1 and 3


2013-01-25 23.48.04

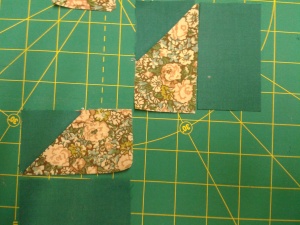
Here you can see where I’ve laid it all out.  Hmm… looks like I needed to do some rearranging.  Don’t worry, I did that before I assembled the block, I promise!


2013-01-25 23.43.00

After I got the layout right, I assembled all the HSTs by laying light on dark and running them through the machine, one after another.  A little pressing of seams, then I put them back where they belonged (in the right place this time).


2013-01-25 23.48.18

I then laid the center row on top of the left row and chain pieced and stitched.2013-01-25 23.52.00
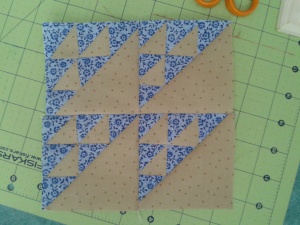
Then I repeated this step by laying the right blocks on top of the center blocks, and stitched.  After a light pressing, it was a simple matter of sewing the three rows together to make the assembled block.  I really like this one.  But I can’t for the life of me figure out why it’s called “Box”.  Anyone know the answer to that one?

2013-01-26 00.08.04

Bowtie Block

Leave a comment

Oh my goodness!  This block really could not be any easier.  You use two templates, 3 fabrics, and have 7 seams.  It went together so quickly and was fun to assemble.  As usual, I thought I knew what fabrics I was going to use until I actually sat down to make it.  In fact, few of the blocks so far have used the fabrics I intended.  Some of them, if I had to do it again, would be different.  In fact, I may redo them.  We’ll see.

So, here’s how I made this block:

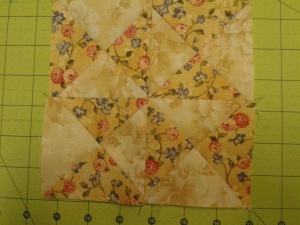
I took 4 charms, with two from each pattern2013-01-26 00.13.23.  Believe me when I tell you they’re more contrasting in person than they are in the photo.  I stacked them all on top of each other and, using template #18, I trimmed them down to size


2013-01-26 00.17.26

For the knot of bow, I used template# 7 to cut four green triangles.  I laid all the pieces out in a square with matching fabrics opposite each other.  Then I laid the green knot pieces face down on top of them.  I chain pieced them and then pressed all the seams, then laid everything back in its original position.


2013-01-26 00.29.59

After that, I laid right over left and sewed the top two pieces together, then the bottom two.  With the seams pressed so that they will nest nicely, I laid the top over the bottom and sewed the final seam.

After I was all done, I was wondering if there would be a different way to do this block that might be a little easier.  And while I haven’t tried it out yet, it occurs to me that you could cut four 3 1/2″ x 3 1/2″ squares of two contrasting fabrics.  Then cut four 2×2″ squares for the knot.  Lay the smaller squares on top of the larger ones and snowball one corner on each of the larger squares, then sew it together.  I don’t know that this would be easier, and I think there would be more waste than doing it with the templates.

With that said, I can see making a quilt with lots of bowtie blocks sashed in between each one.


Tulip

2 Comments

When I was looking through my book and comparing blocks, I got it in my head that Bouquet and Tulip were virtually identical, except for the bottom corner, which is a HST in the first and a square in the second.  Since I was making the Bouquet block today, I figured I’d just whip out the Tulip block as well.  And, in fact, Bouquet was a great preparation for Tulip.  It wasn’t until I got into it, however, that I realized there were a couple other subtle differences.

2013-01-22 12.51.26This is the finished Bouquet block.  Note the V shape from the basket up through the leaves.


2013-01-22 16.04.17

This the finished Tulip block.  Note how the lower half forms a support for the flower, and the leaves extend all the way out and become part of the outer edge of the block.

Here’s how I did it.


2013-01-22 15.31.08

The templates that are needed are 4, 7, 16, 16r, 45, 93, and 93r.  What’s that you say?  4, 93 and 93r aren’t pictured here?  You’re absolutely right.  Remember I said I thought this block was just like Bouquet except for the bottom corner?  Well, I cut out rectangles, making one of them 2″ longer so that I didn’t have to cut out a 2″ square of fabric just to sew it back to where I cut it off from.  I neglected to take seam allowances into consideration, so if you do this, only make it 1 1/2″ longer, not 2″.  When I realized that the rectangle pieces needed to have angled ends, I placed them right sides together, placed template 93r on top of them and trimmed the angle.

2013-01-22 16.00.29

  1. Starting at the top, I matched the short sides of the background triangle to the short side of the petal pieces.  With this block, I chose to press my seams open and will likely be doing that from here on out.
  2. Next I matched the long sides of the background triangles to the outside edges of the petals, sewed them together and pressed the seams.  In fact, let’s just make it simple:  after every seam is sewn, I press it.
  3. With right sides together, I matched the long sides of the background triangles to the top, short edges of the leaves.
  4. Lining up the edges and the seams, I placed the petal portion on top of the leaf portion and sewed them together.
  5. I took the two mirror images of the flower, placed them right sides together, taking care to match the seams, and sewed them together.
  6. To make the lower half of the block, I sewed the short rectangle to one side of the yellow triangle, making sure the angle of the triangle continues on.  I then repeated this on the other side, sewing the longer rectangle to the yellow triangle and the red background.
  7. With the two halves completed, it was really simple to lay the two halves on top of each other and sew the long diagonal seam.

My finished tulip is beautiful, if I do say so myself.  I love the way it turned out.

2013-01-22 16.04.17

Bouquet

Leave a comment

It doesn’t happen often, but from time to time my husband will get a wild hair and bring me a bouquet.  My favorite consisted of half a dozen tiny pink roses that had been generously sprinkled with glitter.  They came in a tall, curvy, deep purple vase.  The flowers dried perfectly in the vase and stood on my shelf for literally years.  They were so pretty.  The leaves even dried kind of a purpley color.  Finally, though, I had to get rid of them.  They were a fantastic dust magnet.  Still, it was hard to throw them out.

This next quilt block is called Bouquet, and I choose to let it remind me flowers from my sweet husband.  Except this bouquet will never die!

When I first looked at the pattern, I thought it would be easier than it turned out to be.  The problem is the rhombus shapes have to go just so or the whole thing is off.  I had half the block put together and then had to pick it apart.  The key, I think, to assembling this block is to lay it all out first, make sure everything is right and then start assembly.  Ok, ok, so that’s the key to any block, but you know what I mean.

2013-01-22 11.56.37 When I looked t the block initially, I noticed that the top piece is essentially a square between the flower petals.  I couldn’t for the life of me figure out why the directions would be more complicated by making it two triangles sewn together.  So, thinking I knew better, I cut out a 2″ square instead of two 2″ triangles.  Was it a good decision?  Nope!  In fact, I ended up tossing it aside and replacing it with the called-for triangles.

I cannot stress enough how important it is to make sure the petals (rhombus) are laid out correctly.  2013-01-22 12.17.04If you don’t, it will look all skeewampus, like this.   When sewing the background triangles to the leaf pieces of the boquet, make sure to match the long sides. 

  1. Sew a background triangle to the outside edges of the two petal pieces.  Press the seams and set aside
  2. Place the short side of a background triangle to the top, inside edge of the two petal pieces and sew together.  Press the seams and set aside.
  3. Lining up along the long sides, sew a background triangle to the top edge of each of the leaf rhombus pieces.  Press the seams and set aside.
  4. Take the two mirror pieces and place them right sides together, taking care to m2013-01-22 12.42.29atch the seams, then sew them together.  Press the seam and set it aside.
  5. Going to the base of the block, sew together the background triangle with the brown basket piece, making a HST.  Press the seam.
  6. Sew a long rectangle background piece (I used the one on the bottom) to the newly created HST.  Press and set aside.
  7. Take the unattached rectangle, place it on top of the right side of the flower part of the block.  Sew together and press.
  8. With right sides together, sew the long rectangle/HST piece to the flower part of the block, and press the seam.2013-01-22 12.51.26  Your finished block should look like this.

Birds in the Air

4 Comments

In the MSQC Quilt Along, there are a number of people ahead of me as far as block construction.  I love seeing these completed blocks before I make mine.  First, because it gives me impetus to try and catch up and second — and probably more importantly — it gives me a better visual of what I’m shooting for!  So, for those of you kind enough to show me what I’m doing, thank you.

Birds in the Air is another of those blocks that I’ve seen others complete before I even started.  The pattern uses two templates:  One large triangle (#8) and one small triangle (#13). 2013-01-22 10.31.34 I looked at all those itty-bitty triangles to make all those lovely birds, and I just knew there had to be an easier way.  And I remembered seeing Jenny Doan of the Missouri Star Quilt Company demonstrating how to make quick and easy HSTs by cutting two pieces of fabric into identical squares, sewing 1/4″ around the entire block, then cutting the whole thing in quarters along the diagonal.  I cruised the net looking for some sort of instruction on how to calculate how to make the original square.  None of the calcu2013-01-22 10.55.19lations seemed to work for me.  Since I’m terrible at math, this really didn’t surprise me.  After two or three hours of trial and error, I had exhausted all the fabric I was going to use for my birds and had come to a simple conclusion:  For this block, at least, I needed to use the templates.  Once that decision was made, cutting out the fabric went quickly, and I found myself secretly relieved.  At least with the templates I don’t have any little ears to cut away once the pieces are sewn together.

2013-01-22 11.19.03

I ch2013-01-22 11.05.45ain-pieced twelve blue to twelve tan of the small triangles, then cut them apart and pressed the seams all one direction.  Then I sewed 8 of my HSTs together in pairs, and pressed the seams.  To them I sewed2013-01-22 11.32.50 4 blue triangles to the right side.  This formed the first row.  I also sewed the remaining blue triangles to the right side of the remaining four HSTs. This formed the second row.  And finally, I sewed the last four blue triangles to the bottom left of the second row. This gave me four triangle units made of blue and tan triangles.

After that, it was smooth sailing!  I sewed one large tan triangle to each of my newly completed flocks of birds.  I did take a moment to square up each quarter block to 3 1/2″ .  Then I laid the four quarters side by side in a square, making sure they were all going the same way.  I laid the right blocks on top of the left and chain pieced them.  After cutting them apart and pressing the seams in opposite directions, I laid them on top of each other, nested the seam, and sewed them together.  I’m really pleased with how this turned out.  All in all, it took me about 30 minutes to make this block.

2013-01-22 11.52.17

Big Dipper

Leave a comment

Initially I had thought to use some cute stars and moon fabric for this block, but it wasn’t very vintage and kind of clashed with the feel of the rest of the quilt.  Pity, that.  So I went digging in my stash for something with the right feel, and I found a lovely charm pack that worked perfectly and I decided to go with floral prints.

The instructions I had called for cutting 8 small triangles of each color and piecing them together.  The thought of all those triangles made my head spin!  A little searching and a little math helped me come up with a simpler method.  Well, simpler for me, anyway.

If the block is to finish at 6.5″ square, then each quarter block should finish at 3.5″ square.  I took two squares of contrasting fabric, cut 4.75″ square.  I drew a diagonal line, then sewed 1/4″ along either side of it.  Using a straight edge and a rotary cutter, I cut along the drawn line, then rotated the pieces and cut diagonally the opposite direction.  This gave me four half squares.2013-01-14 22.29.06 2013-01-14 22.19.04

I pressed the seams toward the darker side.  When I put two pieces together, I was able to nest the seams, which made the points line up beautifully.

Once I had all the triangle pairs, I was able to just chain piece them together, giving me 4 small hourglass squares.


2013-01-14 22.40.39 It’s important at this point to take some time to square them up.  This is accomplished by using a squaring up ruler , and placing the diagonal line of the ruler along the diagonal line of the hourglass, with the 1.75″ measurement in the center of the block.  Trim off the two exposed edges.  Rotate the block, line up diagonal line again, and trim off the other two edges.2013-01-14 22.24.23

Arrange the quarter blocks so that the hourglasses sort of tumble around in a circle.  Lay the right hand blocks on top of the left, carefully match the seams, and chain stitch the pairs.  Press the seams in opposite directions, place the two pieces right sides together, nesting the seams, and stitch.  Press it open and suddenly there’s a floral Big Dipper in a subtle floral sky.  I like the way mine turned out, but I’m now wishing I’d used more contrasting colors.

2013-01-14 22.52.06

Bat Wing

2 Comments

Every time I see the name of this quilt block all I hear in my head are the lyrics to a song from 1907:

~Oh the moon shines tonight on shiny bat wing~  which, of course should be RedWing.  Can’t help it.

I’ve been reluctant to tackle this block.  I didn’t like the pictures I’d seen, of black on grey, looking dismal and depressing.  But, I tackled it tonight and ended up liking it in the end.  Fabric choices make such a difference.2013-01-14 21.38.47

While I’ve been trying to find simpler ways to make some of these blocks, this one absolutely required the templates.  I think my next set of templates will have sandpaper on the back.  These, in particular, seemed to slip around quite a bit.  One thing I’m doing is measuring the templates and writing the measurements on the edges of them.

Once I cut out all the pieces, I made sure to lay them all out in order.  Knowing me, they’d get all jumbled and I’d end up with a bat with broken wings!2013-01-14 21.54.57


I decided to start in the middle and sewed the two rectangular background pieces to the center black square.  Initially, I pressed the seams to the center, but then decided to press the seams to one direction.

Next I tackled the “wing” portions.  I sewed the black triangle to th2013-01-14 22.01.09e light background triangle, matching the corners, and then pressed toward the dark.  I repeated this for the rest of the wing pieces.

Once the three rows were completed, I matched up the edges and sewed the center to the bottom row, then sewed it to the top row.  Et viola!  C’est un Bat Wing quilt block.  It finished up perfectly at 6.5″ square.

2013-01-14 22.11.05

Missing Templates

Leave a comment

template_10

template_36R

template_105

So it seems the amazing condensed template file I’ve been using is missing a couple of templates.  Three to be exact.  HUGE kudos to LISAPC from our forum for tracking these down and sending them to me.

If you’re trying to access these and having difficulty, shoot me an email at dragonfoote@gmail.com.


Basket

Leave a comment

2013-01-07 22.44.27This pattern, traditionally, is a solid basket fabric on a print background.  Normally, I try to follow the rules, or tradition, but this time I really wanted to use this floral print as the basket, and when I was laying out fabrics, I just really liked the contrast between the floral and the dark green.  I was excited about how it would turn out!


2013-01-07 22.47.36

I really need to come up with a good name for these odd-shaped, almost rectangle pieces.  Wedge?  We’ll call it a Wedge.

I sewed a small green triangle to the end of each wedge, laying right sides together, laying the triangle with the long edge lining up with the angle of the wedge.  I chain stitched the two wedge/triangle pairs, then pressed toward the green.  So far so good!  Next I sewed the green rectangle to the long side of the wedge/triangle.

As I was working, I made sure to lay the pieces back where they belong so that I could make sure I was putting everything in its proper place.2013-01-07 22.55.07

Next I did the bottom of the basket.  Two basket triangles are sewed to the right and bottom edges of  a background square, forming a larger triangle.  Then I took the background triangle and laid it face down on the basket/background triangle, forming a square.  In fact, at this point, I had four mini-blocks, each 3.5″ square, which is just what I wanted.  I pressed the seams so that as I sewed the pieces together, the seams would nest up nicely.  With pins holding the seams, I placed the right blocks on top of the left, right sides together, chain stitched them.  I pressed the seams going opposite directions, nested the seams, and sewed the two halves together.

2013-01-07 23.02.36

Here’s my nearly finished block.  It’s missing a handle.  It’s also quite skeewampus.  Here’s why:

The fabric I used for the background is very light weight, much lighter weight than standard cotton.  It shifted and twisted and moved and with each new seam, it was looking worse and worse.  And the template for the handle is trapped in my computer until I get a new printer cartridge.

I love the FEEL of this block, with the floral on the green.  So I’ll be making this one again, with a heavier weight background fabric.  Darn.  Guess that means I need to go to the fabric store.

Basket Weave

Leave a comment

I’ve been looking forward to making the basket weave block since the beginning.  Probably because it’s the easiest! lol

The instructions I have call for cutting 4 strips of each fabric, each 1.5″ x 3.5″.  Knowing how I roll, that seemed like a recipe for disaster.  Besides, it’s a lot of extra steps.  So, here’s how I made mine:

Cut three strips of contrasting fabric, 1.5″ x 15″

2013-01-07 21.59.51


Create a stripset by sewing the strips together along the long seams, then press the seams,  I ended up pressing the seams of the center strip toward the outside.  My stripset measured 3.5″ x 15″.


2013-01-07 22.07.37


I squared up the ends and cut the stripset into 3.5″ segments.


2013-01-07 22.10.23


Here’s how I arranged my pieces.  Another way would be to rotate each piece 90 degrees to the right, giving it a completely different look.  I didn’t think to take a picture of that.


2013-01-07 22.14.12


And here’s my finished basket weave block.  I’m happy with it.

Older Entries